Reaction-Eikonal model experiment
Module: tutorials.02_EP_tissue.06_eikonal.run
Section author: Aurel Neic <aurel.neic@medunigraz.at>
Introduction
This experiment is designed to show how to switch from the default Reaction-Diffusion propagation driver to a Reaction-Eikonal one and to demonstrate the differences between the drivers w.r.t. the computed potentials.
A small tissue strand (dim 30 x 0.5 x 0.5 mm) is excited in its center by a transmembrane current. Excitation then propagates towards both outer sides. The propagation driver can be selected to be either the diffusion term of the Monodomain / Bidomain model, or one based on the solution of an associated eikonal model.
Usage
The experiment-specific options are:
--sourceModel {monodomain,bidomain,pseudo_bidomain}
                      pick type of electrical source model (default is
                      monodomain)
--propagation {R-D,R-E+,R-E-,AP-E}
                      pick propagation driver, either R-D (reaction-
                      diffusion), R-E (+) with (-) without diffusion or AP-E
                      (prescribed AP without diffusion) shape with trigger
                      instant(default is R-E+)
--duration DURATION   duration of experiment, typically 25. ms for
                      activation only, 400 ms to include repolarization
                      (default is 25.)
--tag TAG             add tag to simulation ID
Using the --propagation argument, the user can select the propagation driver. The
choices are:
- R-D: Ionic reaction term with the Mono-/Bidomain diffusion term.
- R-E-: Ionic reaction term with Eikonal-based propagation driver.
- R-E+: Ionic reaction term with the Mono-/Bidomain diffusion term and an additional Eikonal-based propagation driver to enforce conduction velocity.
- AP-E: Prescribed Action-Potential functions with Eikonal-based propagation driver.
Using the --dry option, one can observe which command-line options are added/removed
when switching, propagation drivers.
In a nutshell, R-E propagation is activated by adding the -stimulus[1].stimtype 8
option. The difference between R-E+ and R-E- is that R-E+ includes diffusion via the
-diffusionOn 1 option. As a consequence, in experiments featuring spatially
heterogeneous ionic models, R-E- shows significant artificial potential gradients
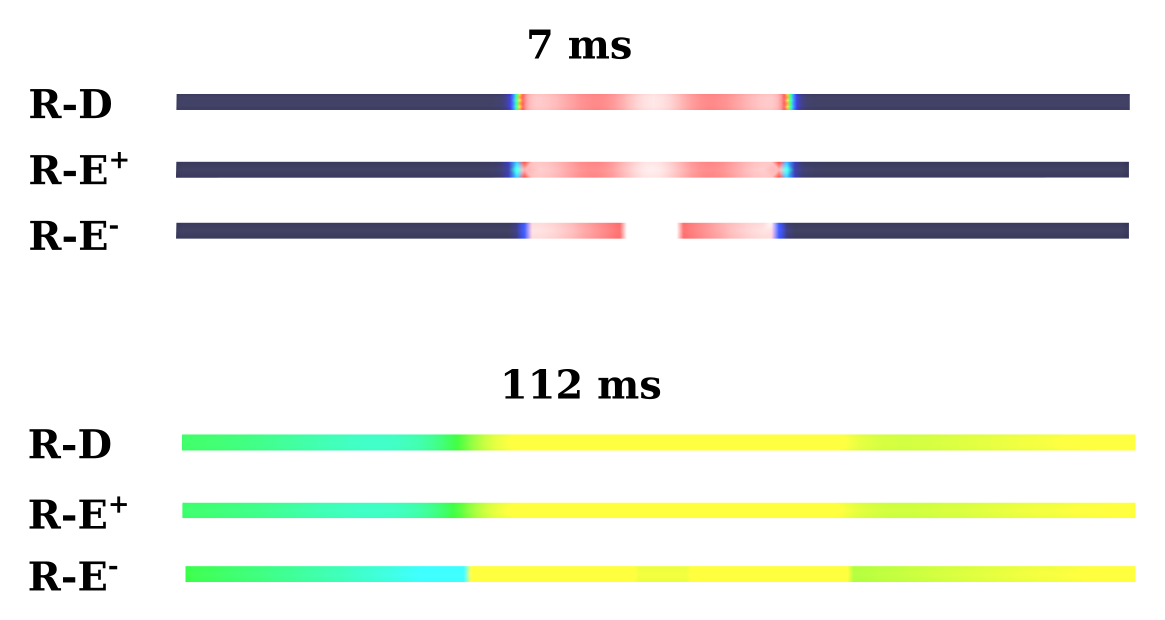
at the interfaces between regions with different models. The following picture shows Vm
at 7 and 112 ms for R-D, R-E+ and R-E-:
Example
To run the example and visualize output, run:
./run.py --np NP --propagation PROP --visualize
Where NP denotes the desired number of processes and PROP the propagation mode.
